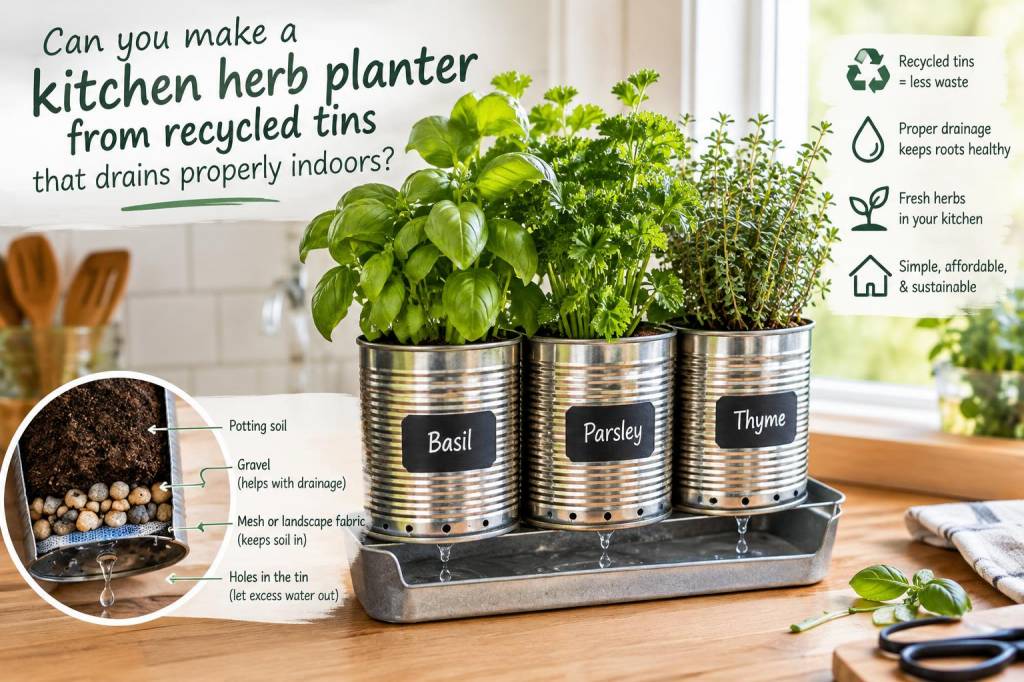
Yes, you can make a kitchen herb planter from recycled tins that drains properly indoors, and I love this project because it combines practicality, thrift, and a bit of charm in one simple setup. I have made versions of this for windowsills, open shelves, and narrow kitchen corners, and when it is done well, it feels polished rather than improvised. The key is not just decorating a tin and dropping in soil. The real challenge is drainage, because herbs dislike sitting in wet compost, especially indoors where excess moisture can lead to root rot, mouldy soil, and a lingering damp smell.
What I appreciate most about recycled tins is that they are already the right size for many herbs, they are easy to find, and they suit a low-waste home beautifully. Coffee tins, large food tins, and sturdy canned food containers can all be turned into useful planters with a little care. I usually choose tins with enough depth for roots, then I focus on making sure water has a safe place to go. Indoors, that matters more than style, because a planter that looks lovely but traps water will only frustrate you later.
Choosing tins that are worth reusing
Not every tin is a good candidate for planting. I look for containers that are strong, clean, and free from sharp edges. A tin should feel solid in your hands, with no rust spots that might weaken it, and no lingering food residue or sticky labels. If I can, I choose tins with straight sides, because they are easier to decorate and easier to line if I decide to add a moisture barrier. Wider tins are often better for herbs like basil, parsley, or chives, while slightly taller tins suit thyme or rosemary if you are careful with watering.
I also think about placement before I start. A windowsill planter needs a neat footprint and a base that will not stain the paint or wood beneath it. If the tin will sit on a tray, I have a little more freedom. If it will stand directly on furniture, I make extra effort to protect the surface underneath. That small detail saves a lot of trouble later.
What makes indoor drainage different
Outdoor containers can often drain straight into soil or gravel, but indoor planters need a cleaner system. When I grow herbs inside, I always want a way for excess water to leave the root zone without spilling onto the floor or soaking into a shelf. A traditional planter with a single hole in the base can work indoors if it sits inside a saucer, but with recycled tins I often prefer a two-layer method or a controlled drainage design.
The simplest answer is to add drainage holes to the base and place the tin on a matching saucer or tray. That is usually enough for most herb setups. If you do not want water visible beneath the planter, you can use a hidden inner liner with holes, then keep the decorative tin outer shell dry. I have used both approaches, and each has its place. The best option depends on where the planter will live and how often you expect to water it.
Materials I use for a tidy recycled tin planter
- Clean recycled tins in a suitable size
- Hammer and nail, or a drill with a metal bit
- Protective gloves and safety glasses
- Fine sandpaper or a metal file
- Small saucers, trays, or a waterproof catch base
- Fine gravel or clay pebbles for a drainage layer
- Quality potting mix suited for herbs
- Optional paint, primer, or waterproof sealant
- Optional coconut coir liner or a plastic nursery pot to fit inside
I keep the materials simple on purpose. Fancy supplies are not necessary, and in many cases less is more. The most important parts are a stable drainage plan, a safe edge finish, and soil that does not hold too much water. Herbs grow more happily in a modest container that drains well than in a decorative pot that stays soggy.
My preferred method for proper drainage
I start by washing the tin thoroughly and removing every label and glue trace. If the metal has a sharp rolled edge inside, I check it carefully and smooth any rough spots with a file. Then I make drainage holes in the base. For most medium tins, I use three to five holes spaced evenly across the bottom. If the tin is larger, I may add a few more. The goal is not to weaken the base, but to let extra water escape freely.
If I am using a hammer and nail, I place the tin on a sturdy surface and punch the holes slowly. If I use a drill, I work gently and let the bit do the work. After that, I rinse away any metal dust. Once the holes are made, I add a thin layer of gravel or clay pebbles. I know some gardeners skip this step, but I still like it in tins because it helps keep the drainage holes clear and creates a small buffer at the bottom. Then I add a well-draining herb mix and plant the herbs at the same depth they were growing before.
To protect indoor furniture, I always place the tin on a saucer or tray. I like trays with a lip, because they catch run-off neatly. If I want a softer look, I sometimes tuck the tins onto a shallow ceramic platter with a felt pad underneath. That way the planter feels intentional and considered rather than improvised.
When I use a liner instead of open drainage
There are moments when I do not want holes directly in the decorative tin. Maybe the tin is especially beautiful, or maybe I want to keep the outside surface completely dry. In that case, I use a smaller plastic nursery pot, a compostable liner, or a fitted insert with drainage holes inside the tin. This gives me a hidden watering system: the inner pot handles drainage, while the outer tin acts as a cover.
This method works well if I want to rotate herbs in and out, or if I expect to move the planter often. It also makes cleaning easier. I can lift out the inner pot, empty any standing water, and wipe the outer tin dry. For beginners, this can feel less risky than drilling holes in a beloved tin. It is not quite as direct as a fully drilled planter, but it is very practical for indoor use.
What herbs perform well in recycled tin planters
I choose herbs with the container size and light level in mind. Basil, parsley, mint, chives, thyme, oregano, and coriander can all do well in tins if the light is right and the drainage is sensible. Mint grows vigorously, so I often give it its own tin rather than mixing it with slower herbs. Basil prefers warmth and regular moisture, but not wet roots. Thyme and oregano like a drier rhythm, so they are excellent candidates for tins that drain quickly.
If I am styling a kitchen windowsill, I often group herbs by watering needs. That helps prevent me from overwatering one plant while trying to care for another. It also makes the arrangement look calmer. A row of mixed herbs can be lovely, but I prefer a thoughtful mix of sizes and leaf textures rather than a cluttered cluster of mismatched tins.
Small design choices that make a big difference
I enjoy giving recycled tins a finish that suits the room, but I try to keep the surface treatment practical. Chalk paint, matte mineral paint, or a simple wrapped twine detail can look lovely. If I paint the tins, I always let them cure fully before planting. I avoid thick coatings inside the container unless I know they are safe for moisture exposure, because the inside will naturally get damp over time.
Labels are another detail I love. I sometimes write herb names on small paper tags tied with twine, or I stamp names onto wooden markers. That is easier to change than painting directly on the tin. It also keeps the look flexible if I swap herbs seasonally. For a kitchen with a calm, natural style, I like soft whites, clay tones, sage greens, or simple bare metal with a brushed finish.
Common mistakes I try to avoid
| Mistake | What I do instead |
| No drainage holes | I make several holes in the base or use a fitted liner with drainage |
| Standing water in the saucer | I empty the tray after watering |
| Very heavy soil | I use a light herb mix with good airflow |
| Oversized tins for tiny plants | I match the container size to root volume and herb type |
| Sharp metal edges | I smooth them before planting |
| Too much water too often | I check the soil before watering again |
Those mistakes are easy to make, especially when the project is driven by style first. I have learned that herbs are far more forgiving when the planter is honest about drainage. A recycled tin can look charming and still be structurally sound, and that balance is what I aim for every time.
How I water herbs in recycled tins without causing trouble
I water slowly and in small amounts. I never pour until water floods straight out of the holes, because that usually means I have given too much. Instead, I water until the soil feels evenly moist, then I wait and check the saucer. If liquid collects below, I tip it away after a few minutes. In winter, I water less often. In summer, especially near a bright kitchen window, the herbs may dry out faster than expected.
One habit that helps me a lot is lifting the tin before and after watering. That quick weight check tells me whether the soil is still holding moisture. Over time, I get used to the feel of a pot that needs water versus one that still has enough. It is a simple technique, but it prevents many indoor herb problems.
Why I keep returning to this project
I keep coming back to recycled tin herb planters because they fit so naturally into a mindful home. They are affordable, they reuse materials already in circulation, and they bring living greenery into a place where I cook every day. I also like that they do not demand perfection. A slightly dented tin can still become something useful and beautiful, and that is often exactly the kind of quiet transformation I want in my home.
When I place a row of herbs on the kitchen sill, I see more than plants. I see a small system that supports daily life: fresh leaves for cooking, less packaging waste, and a handmade object that feels connected to the room. That is why I think recycled tins work so well indoors when drainage is handled properly. They are simple, adaptable, and charming, which is a combination I always return to in my own space.
If you want a planter that looks good, works well, and supports a slower, more resourceful way of living, a recycled tin is a very smart place to start. With a few careful choices, it can drain properly, stay tidy indoors, and serve your kitchen for a long time.