I’ve been making seasonal wreaths for years, and one of the questions I get asked most often is whether it’s possible to make a reliable, non-toxic adhesive using natural ingredients like pine resin and beeswax. The short answer is yes — you can make a strong, flexible glue that’s perfect for binding dried foliage, small branches, pinecones and light ornaments to a wreath base. Below I share a tested recipe, step-by-step method, safety and sourcing notes, and practical tips to keep your wreaths lasting through autumn and beyond.
Why pine resin and beeswax?
Pine resin (colophony) is naturally tacky and has been used historically as an adhesive and sealant. Beeswax adds pliability, reduces brittleness, and makes the mixture easier to work with at lower temperatures. Together they create a warm, slightly sticky adhesive that holds organic materials well without relying on synthetic chemicals. I like this combo because it aligns with my low-waste, natural approach to decorating and it smells lovely — a subtle woodsy note that suits autumn wreaths.
Sourcing ingredients
Here’s what I use and where I find it:
Pine resin (colophony): Look for food-grade or craft-grade resin from reputable suppliers. Herbal suppliers, soap-making stores, or woodcraft shops often sell it. In the UK, suppliers like Essential Depot or local beekeeping/soap-making shops carry small amounts. If you forage pine resin yourself, make sure it’s from a clean, unpolluted area and filter well.Beeswax: I prefer raw, unbleached beeswax from local beekeepers or brands like Bee Good or Neal’s Yard Remedies. Block beeswax is easiest to work with.Optional: carrier oil (sunflower, grapeseed or fractionated coconut oil) — a touch of oil softens the glue and improves spreadability. Use a neutral, light oil.Small jar, double boiler or heatproof bowl, wooden spatula or spoon, silicone baking mat or parchment paper for cooling.Tested recipe: autumn wreath glue
This recipe is my go-to. It’s flexible enough for most wreath-making tasks yet strong enough to hold pinecones, berries and dried seedheads.
| Pine resin (colophony) | 2 parts (by weight) |
| Beeswax | 1 part (by weight) |
| Carrier oil (optional) | 0.25–0.5 part (by weight) |
Example: 20g resin + 10g beeswax + 2–5g oil.
Method
Work carefully and slowly — resin gets hot and can spatter if heated too quickly.
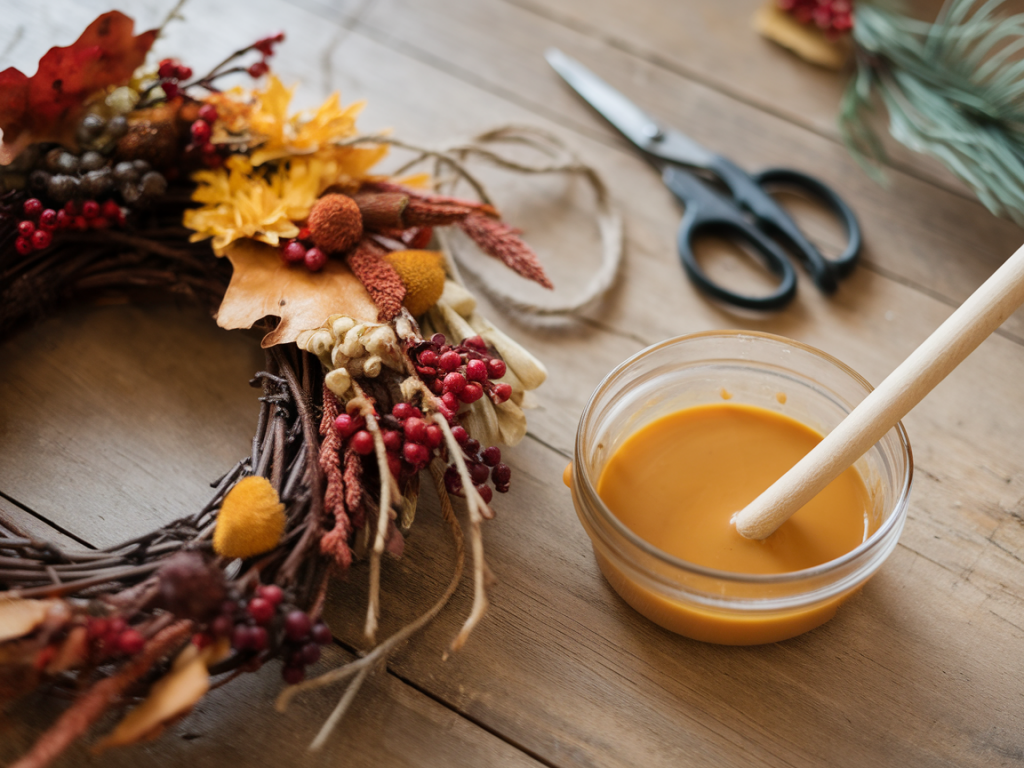
Set up a double boiler: bring a small saucepan of water to a gentle simmer and place a heatproof jar or bowl on top. Avoid direct heat.Grate or chop the beeswax to speed melting. Break resin into small pieces or grate if possible.Add resin to the jar first and allow it to gently soften in the steam. Stir occasionally with a wooden spatula.When the resin has mostly melted, add the beeswax and continue stirring until fully liquid and homogeneous.If using oil, stir in the oil last. The oil lowers the melting point and improves spreadability.Pour the melted mixture into small tins or moulds, or spoon it onto a silicone mat to cool into ‘drops’ you can re-melt in a pot.Label containers with the date and ratio. Store in a cool, dry place away from direct sunlight.How I use the glue for wreaths
I reheat small amounts in a metal spoon over the double boiler or use a small melting pot designed for wax/resin (I use a low-temperature wax melter for longer sessions). Work in small batches — the glue sets quickly as it cools.
For attaching sprigs or small bunches: apply a dab to the base of the stem, press into the wreath form (grapevine, willow or frame) and hold for 10–20 seconds until tacky.For heavier items (pinecones, eucalyptus bunches): apply a generous base of glue to the object, press onto the wreath base, and reinforce with floral wire or a twig pin if needed. The glue will anchor the first few hours; wire adds mechanical strength long-term.For clusters or layered textures: use glue to tack pieces in place, then cover joins with moss, raffia or twine for a neat finish.Longevity and testing
I’ve tested wreaths made with this glue indoors for 6–12 months with excellent results. That said, performance depends on a few factors:
Temperature: Natural glues soften in heat. If your wreath will hang in a warm porch or sunlit area, expect some tackiness in hot spells. I avoid placing natural-resin-glued wreaths in direct summer sun.Humidity: High humidity can make the glue slightly tackier but not usually a problem. Drier conditions make it firmer and less flexible; the beeswax helps with that.Weight of attachments: Heavy objects need mechanical support (wire, twine). I recommend using the glue primarily for medium and light items.Outdoor exposure: Pine resin is water-resistant but not wholly waterproof. A sheltered porch is fine; an exposed, rainy location is not recommended unless you seal the wreath or use synthetic adhesives for critical joints.Improvements and variations
Over the years I’ve tried small tweaks:
More beeswax for a softer, less brittle glue that’s easy to reshape. Ratio 1:1 gives a tackier, softer result but less “grab.”Less beeswax and more resin for a stronger, stickier adhesive — great when you want immediate hold but remember it can be brittle when cold.Add 5–10% damar resin for a clearer, harder finish (used in varnishes). This is optional and shifts the glue toward a firmer, more amber-hued result.Use jojoba or fractionated coconut oil for a longer shelf-life (they’re less prone to rancidity than other oils).Safety and practical notes
Natural doesn’t mean risk-free. Pine resin can be a skin sensitiser for some people. Always:
Work in a well-ventilated area and avoid inhaling fumes if you’re heating larger quantities.Use gloves if you have sensitive skin or any cuts; resin is sticky and can irritate.Heat gently in a double boiler — never flame directly under resin or wax to avoid burning or spitting.Test a small amount on your materials first to check for staining — some resins are more amber and can tint very light dried leaves.Troubleshooting
If your glue is too brittle: remelt and add more beeswax (10–20% extra) or a touch more oil. If it’s too soft or sticky: remelt and add a little more resin, or chill longer before use. If it crystallises or becomes grainy: reheat gently and strain through fine muslin to remove impurities.
Alternatives
If you need a fully waterproof or stronger industrial hold, professional floristry glue sticks (hot glue) or silicone adhesives will outperform natural glue for outdoor or heavy-duty use. For a middle ground, plant-based PVA glues exist but often contain additives and are not as warm or plastic-free as my resin/beeswax mix.
Making your own pine-resin and beeswax glue is a small ritual I enjoy in early autumn — it connects me to the materials and sets the tone for a cosy, handmade season. It’s not a one-size-fits-all solution, but for indoor or sheltered wreaths, it’s a wonderfully natural option that fits my approach to slow, thoughtful decorating.