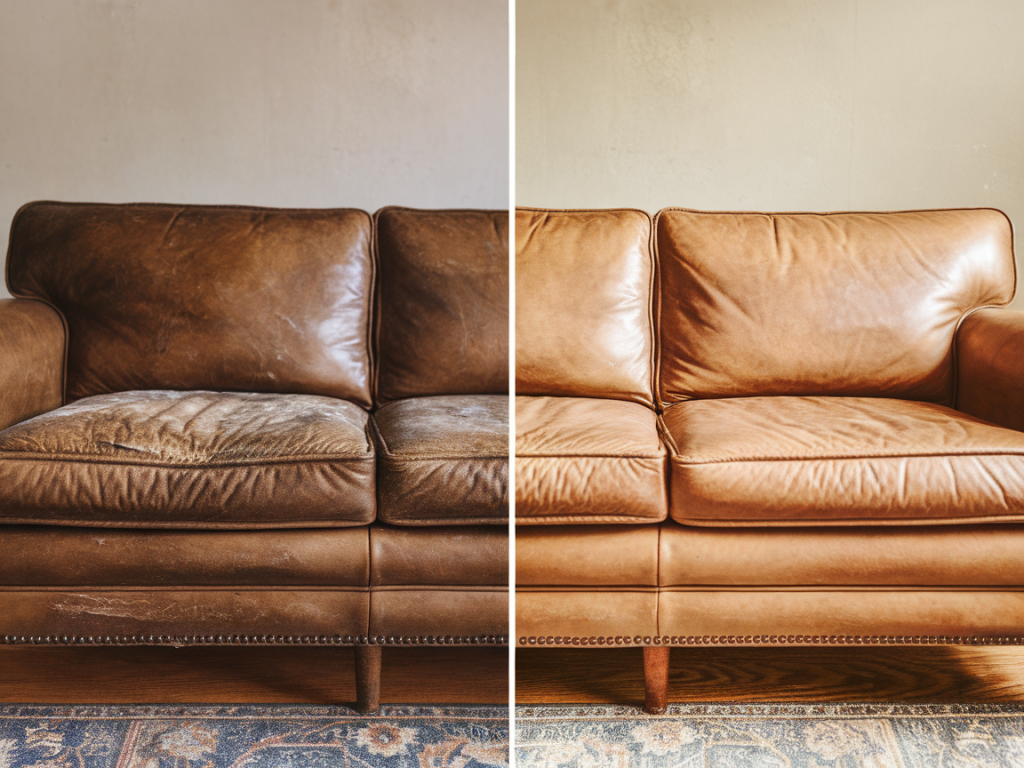
I found my thrifted leather sofa tucked into the corner of a charity shop one rainy afternoon — a generous shape, deep cushions and solid bones, but the leather was tired, dry, and marked with small surface scratches. I couldn’t bring it home fast enough. Reviving leather doesn’t require expensive professional treatments; with a little patience, a neutral saddle soap to clean and a beeswax-based polish to nourish and protect, you can bring a secondhand sofa back to life while keeping the process low-waste and wallet-friendly.
Why I choose neutral saddle soap and beeswax
Neutral saddle soap is a gentle, pH-balanced cleaner designed for leather. It removes dirt, old polish and body oils without stripping natural oils too aggressively. I favour a neutral formula for thrift finds because it’s less likely to alter the leather’s colour than some coloured or scented cleaners.
Beeswax is my go-to for finishing because it:
Together, they clean and replenish the leather while keeping the treatment simple and reversible — important when working with vintage pieces or richer patinas you want to preserve.
What you’ll need
Gather these tools before you start. I keep a small kit for leather work so it’s easy to tackle thrifted finds when they come along.
Before you begin — inspect and test
Start by thoroughly inspecting the sofa. Look for:
Always do a spot test. Apply a tiny amount of saddle soap diluted with water on an inconspicuous area (back of the arm or under a cushion). Let it dry and check for colour change or uneven sheen. If you see significant fading, stop and consider consulting a professional or using a product specifically formulated for pigmented leather.
Step-by-step refresh
I break the refresh into three main stages: dry cleaning, deep cleaning, and conditioning/protecting. Tackling it in stages keeps the leather from being overworked.
1. Dry clean and prep
2. Deep clean with neutral saddle soap
3. Assess repairs
Once dry, small surface scratches and scuffs will be more visible. For:
4. Condition and protect with beeswax
Tips for tricky issues
How often to repeat the treatment
For a sofa that sees daily use, I recommend a light beeswax buff every 6 months and a full saddle soap clean plus beeswax treatment once a year. For lower-use pieces, annual maintenance is usually enough. Regular dusting and immediate attention to spills will extend the leather’s life between treatments.
Where I source materials and eco notes
I try to use products with minimal packaging and natural ingredients. In the UK, I often reach for:
When buying beeswax or oils, look for cold-pressed, unrefined oils and local beeswax where possible. This keeps the supply chain shorter and supports small producers — something I always try to prioritise.
| Problem | Quick fix | When to call a pro |
|---|---|---|
| Surface dirt and dullness | Neutral saddle soap + beeswax balm | No |
| Deep scratches or tears | Leather repair kit for small areas | Yes — structural damage |
| Ink or heavy dye transfer | Spot treatments (test first) | Often yes |
Working slowly and respectfully with a thrifted leather sofa is part of the joy — you’re preserving history as much as restoring functionality. With neutral saddle soap to clean and a beeswax balm to nourish and protect, the sofa will not only look better but age more gracefully, keeping its character rather than losing it under layers of synthetic treatments.