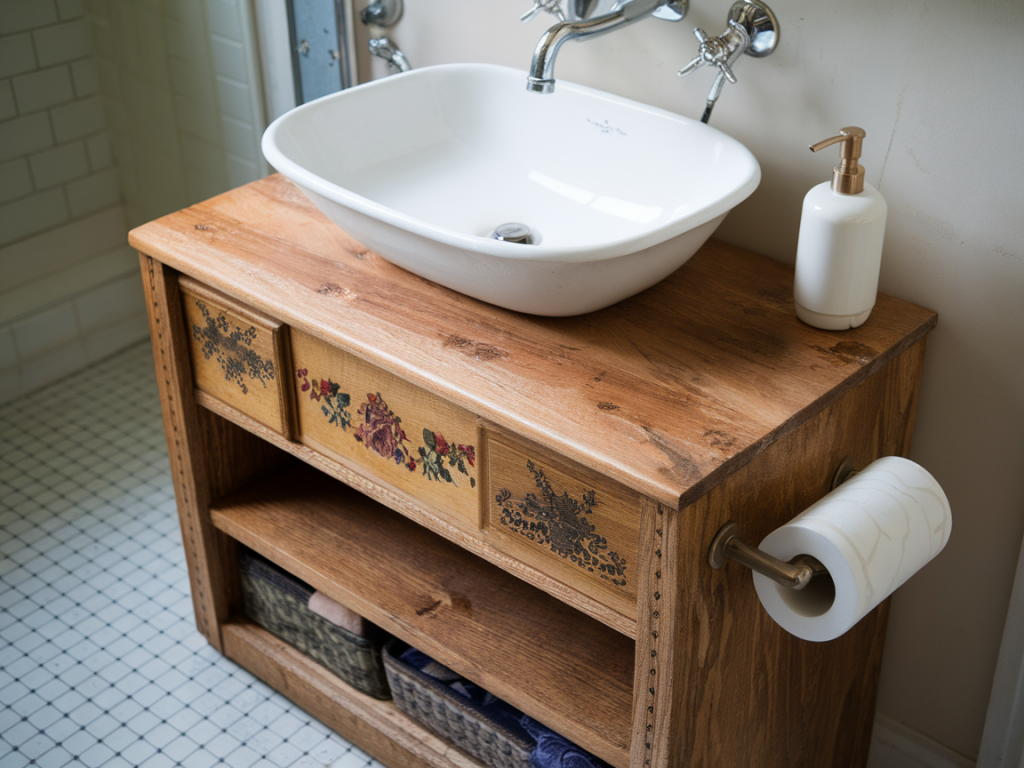
I recently rescued a chipped, slightly wobbly bookcase from a charity shop with the idea of turning it into a bathroom vanity. Small bathroom storage is always a challenge, and I love the idea of giving a second life to furniture rather than buying new. The trick with bathroom projects is making sure wood stands up to moisture — steam, splashes and the occasional drip — without creating a maintenance nightmare. Below I’ll walk you through how I converted that thrifted bookcase into a moisture-friendly bathroom vanity using simple, plumbing-safe sealants and finishes. I tested everything in my own home so these are practical steps you can trust.
Choosing the right bookcase
Not every second-hand bookcase is suitable for a bathroom vanity. When hunting, look for:
- Solid wood or plywood core: These tolerate finishes better than particleboard, which can swell badly when wet.
- Simple construction: Fewer ornate joints are easier to seal.
- Sturdy base: A solid or raised base is preferable to thin legs that wobble — if you find legs you love, you can always reinforce them.
- Reasonable condition: Deep rot or serious water damage is a no-go; light surface wear is fine because we’ll be sealing and reinforcing.
What I removed and added
I removed the back panel (if it was cheap cardboard) and replaced it with a plywood back to create a stable, sealed box. I also fitted a countertop to take a basin — a simple solid wood plank works beautifully when properly sealed, or you can use a pre-made stone or ceramic top if you prefer. I installed a sink and bottle-trap plumbing like you would with any small vanity; the main difference is ensuring all wood edges and joints are well protected.
Materials and tools I used
Here’s a compact table of what I used. Substitute with similar products if you have regional preferences — the important thing is the product properties (waterproof, marine or outdoor rated, neutral-cure silicone, etc.).
| Item | Why |
| Plywood (back panel) | Stable, less prone to swelling than particleboard |
| Epoxy or marine varnish (topcoat) | Waterproof, durable finish for surfaces and edges |
| Waterproof primer (oil-based or hybrid) | Seals wood and improves adhesion of topcoat |
| Neutral-cure silicone sealant (bathroom grade) | Seals joints around basin and plumbing without corroding metal |
| Polyurethane (optional) | Extra abrasion resistance for countertop edges |
| Paint (optional) | For visual updates—use water-resistant, satin or eggshell |
| Small brushes, rollers, sandpaper, jig saw | For cutting, prepping and finishing |
Step-by-step process
These are the steps I follow when converting a bookcase into a moisture-friendly vanity.
- Prep the piece: Strip flaking paint or loose finish with a scraper and sand the surface lightly. Remove old backs or weak panels and repair joints with wood glue and clamps where needed.
- Replace or reinforce the backing: Fit a 6–9mm plywood back to the inside — this helps the unit keep its shape and reduces the number of exposed end grains. Screw it in from the inside, then seal the screw heads.
- Raise the base slightly: I attach small wooden blocks or adjustable legs so the cabinet doesn’t sit directly on the bathroom floor. This helps prevent rising damp and makes cleaning easier.
- Seal all end grains and joints: Brush on a waterproof primer or sanding sealer to all exposed edges, particularly end grains (these soak up water). An oil-based primer or polyurethane sealer works well here.
- Cut hole for basin and plumbing: Measure carefully and use a jigsaw to cut the countertop and the back panel for the waste trap. Test-fit the basin and the bottle trap dry before sealing.
- Apply topcoat(s): For the countertop and any horizontal surfaces I use either a two-part epoxy resin (for a hard, waterproof finish) or several coats of marine varnish (easier to touch up). For vertical faces I use a water-resistant satin paint or a polyurethane topcoat over primer.
- Seal around the sink and waste: Fit the basin and use a good quality neutral-cure silicone around the rim to prevent water ingress. Neutral-cure is important because acid-cure silicones can corrode metal fixtures and aren’t compatible with some finishes.
- Protect internal shelves: Paint or seal internal shelves with two coats of water-resistant primer and a topcoat. If you store towels, you’ll want a finish that won’t smell or off-gas too much; water-based polyurethane is an option here.
- Final checks and drying: Allow everything to cure fully as per manufacturer instructions — epoxy can take several days to reach full hardness. Test for leaks and wipe away any excess sealant.
Why I pick neutral-cure silicone
Neutral-cure silicone (sometimes called oxime or acetoxy-free) is a favourite because it’s stable, adheres to many materials and doesn’t release acetic acid as it cures — that acid can corrode metal trap components and some finishes. Brands I’ve used include Dow Corning 791 and GE Silicone II; both are widely available and bathroom-rated. Use it to seal the basin rim, the hole around the waste pipe, and any external trim joints.
Finishes: epoxy vs. marine varnish vs. polyurethane
Each finish has pros and cons:
- Epoxy resin: Creates a glass-like, fully waterproof surface ideal for countertops. It’s durable but can yellow slightly over time and is harder to repair locally. Good for high-use counters.
- Marine varnish: Designed for boats, so it’s formulated to stand up to moisture and UV. It gives a warm, slightly glossy finish and is easy to recoat when needed.
- Water-based polyurethane: Lower odour, quicker drying, and good abrasion resistance for painted surfaces. Use over a sealed primer on vertical faces and shelves.
Plumbing considerations and safety
When you connect the basin and bottle trap, ensure all plumbing joints are tight but not over-torqued. Place the trap so it doesn’t press against sealed wood joints — leave a little gap and use a bead of neutral-cure silicone to waterproof where the pipe passes through the back panel. If you’re not comfortable with plumbing, a plumber can install and pressure-test the connections; it’s an inexpensive and reassuring step.
Maintenance tips
To keep the vanity in good shape:
- Wipe splashes promptly and dry the countertop after use to avoid standing water.
- Re-seal any worn edges with a fresh bead of silicone or a touch-up of varnish each 1–2 years depending on use.
- Keep the bathroom well-ventilated — a good extractor fan reduces condensation and prolongs finishes.
Common questions I get
Will painted furniture survive in a bathroom? Yes, if you use a proper primer and a water-resistant topcoat. Avoid thin craft paints without sealing.
Can I use untreated pine for the countertop? You can, but it must be sealed thoroughly (end grains especially) with an epoxy or marine-grade varnish to prevent swelling and staining.
What if the bookcase is particleboard? I generally avoid particleboard for bathroom use. If you must use it, protect every surface with multiple coats of epoxy and don’t allow any standing water — expect a shorter lifespan.
Turning a thrifted bookcase into a bathroom vanity is a joyful little project: it saves resources, creates a custom piece, and is a great way to practise mindful making. With careful sealing, the right finishes and attention at plumbing junctions, you can have a beautiful, moisture-friendly vanity that feels warm and well-loved — not like something made for a showroom.