I’ve spent years rescuing reclaimed timber for my own projects and for clients, and one of my favourite finds is old pine floorboards. They bring warmth, patina and a story that new timber often can’t match. But reclaimed pine can be tricky: hidden insect damage, uneven moisture content and unexpected structural issues can turn a bargain into a headache. Below I share how I source and test reclaimed pine floorboards in the UK — the signs I look for, the tools I bring to a collection, and simple checks you can do on site before you commit.
Where I source reclaimed pine in the UK
My first tip is to diversify where you look. Some of my best boards came from places I wouldn’t have expected.
Reclamation yards and salvage centres — these are my go-to. In the UK look for local yards (eg. SELCHP salvage in London, Architectural Salvage in Birmingham, or regional hubs listed on the Reuse Network). The staff often know the provenance of larger batches.Online marketplaces — Facebook Marketplace, Gumtree, eBay and Preloved are great for local finds. Always arrange to see the boards in person and ask for more photos close-up first.Building sites and small renovation contractors — I’ve picked up offcuts or whole rooms of boards from sympathetic renovators. A polite message to local builders or posting in community groups works well.Auction houses and clearance sales — sometimes estate clearances or auction lots include floorboards.Specialist salvage events and festivals — a more curated option but often pricier.What I always ask before visiting
Before I head over to pick up boards, I ask a few practical questions to avoid wasted trips:
Where did the boards come from? (Victorian terrace, farmhouse, warehouse?)Have the boards been treated, painted or previously exposed to damp?How long have they been stored and how are they stacked?Can you send detailed photos of individual boards, including ends and the underside?Essential tools I bring on pickup
Having the right kit makes assessing timber quick and reliable. Here’s my standard pickup toolkit — light, affordable and extremely useful:
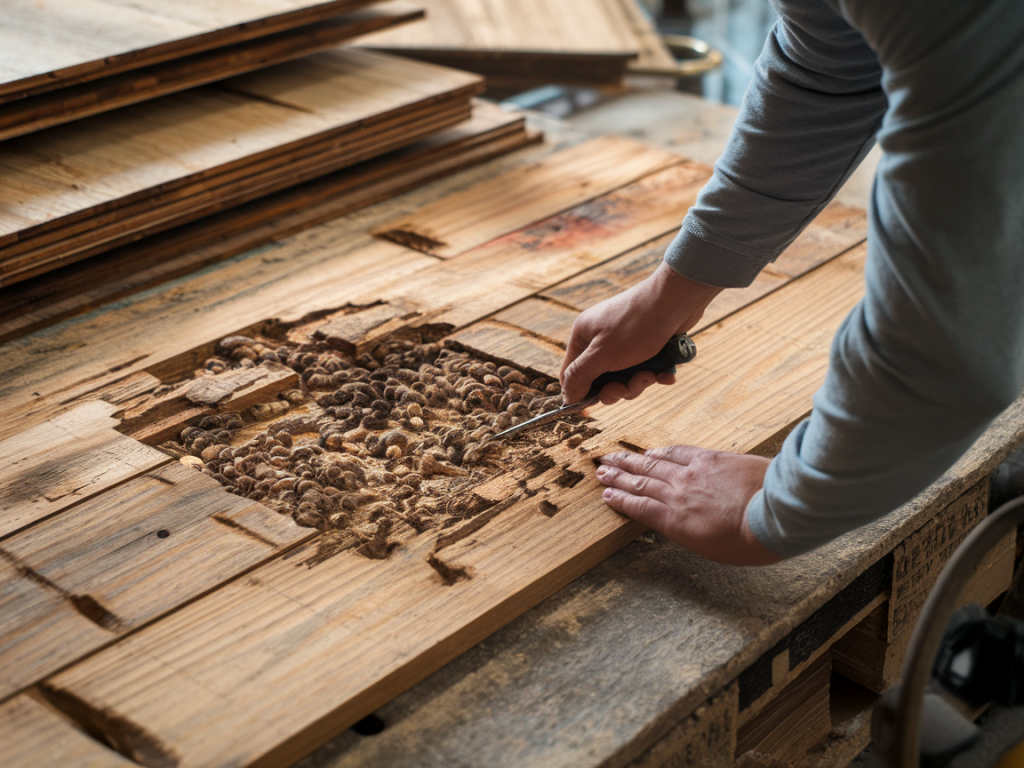
Moisture meter — I use a pin-style and a pinless combo where possible. In the UK, brands like Protimeter or CEM (model DT-128/DT-173 range) are common and reliable. Target moisture for reclaimed floorboards before installation should generally be below 12–14% (see table).Bright torch — for checking end grain, nail holes and insect galleries in dimly lit sheds or vans.Magnifying loupe or cheap jeweller’s loupe — perfect for inspecting tiny bore holes and frass (insect dust).Small pry bar or screwdriver — to lift a board slightly and check the underside and tongue-and-groove condition.Gloves and dust mask — old boards can be dusty, painted or contain old preservatives.Measuring tape — to check board widths and lengths; reclaimed floors are often mixed widths.Smartphone with camera — photograph suspicious areas and board markings for reference or to send to a colleague later.Quick tests and what to look for
Once I’m on site I follow a simple checklist. Each point helps me decide whether the boards are a worthwhile purchase and what post-purchase work will be needed.
Surface inspection: Look for long splits, deep rot, large holes and excessive warping. Surface scuffs and nail holes are fine — they’re part of the character.End grain and underside check: Lift a few boards to inspect the underside and ends. If the underside is saturated, mouldy or shows soft, crumbly wood, that batch is best avoided.Insect evidence: Use your loupe and torch to look for tiny round bore holes (wood-boring beetles) and fine powdery dust (frass). Fresh frass or active beetles are a red flag. Old inactive galleries are usually cosmetic but check depth and quantity.Moisture readings: Take multiple readings across a few boards (ends, centre, underside). Expect variation, but readings above 16% indicate damp timber that needs drying before installation. Aim for 8–14% for most interior installations.Smell test: A musty, “dank” smell suggests long-term damp issues. Treated boards sometimes smell of creosote or preservative; these must be managed carefully.Tongue-and-groove integrity: Check the tongues and grooves for damage — these are expensive to replace or plane out later.Moisture and insect guidance table
| Condition | Moisture % (typical guideline) | Action |
| Dry, ready for installation | 8–14% | Accept — acclimatise on site for a week before fixing |
| Slightly damp | 14–16% | Buy if cheap — dry in a ventilated space for 2–6 weeks |
| Wet / recently exposed | >16% | Avoid or negotiate low price and arrange drying/storage plan |
| Active insect infestation | N/A | Do not buy until treated or avoid entirely |
Dealing with insect damage — when it’s acceptable
Not all insect marks mean the boards are unusable. I’ve used pine with old, inactive beetle holes many times — they add charm once stabilised. Key points:
Old holes with smooth edges and no fresh frass usually mean the infestation is long finished.If you suspect active infestation, ask the seller for information about where the boards were stored after removal. Damp, dark storage invites activity.For peace of mind, consider a professional timber treatment (eg. borate-based treatments) before bringing boards indoors — they’re relatively inexpensive and kind to the environment compared with harsher pesticides.Packing and transporting — practical tips
Boards can be heavy and brittle. I always:
Stack boards flat on a supportive surface (no bending) and strap them or use rope to prevent sliding.Protect painted or finished faces with a sheet of plywood or thick cardboard if stacking other items on top.Keep boards dry during transit — a tarp is essential if the weather turns.Pricing and negotiation
Price depends on provenance, width, and condition. My rule: start low and be honest about any defects you’ll need to fix. If you’re buying a mixed batch, ask for a breakdown: how many full-length prime boards versus short/repair-only boards?
After purchase: drying and storage
Once home, store the boards flat with stickers (thin battens) between layers to allow airflow. A warm, dry garage or workshop is ideal. Monitor moisture with your meter — slow, even drying is best to avoid cupping and splits. For finishing, I favour oil-based or natural hardwax oils — they bring out the grain and add protection while staying relatively low-tox.
Rescuing reclaimed pine is a little bit detective work and a lot of patience, but when you find the right batch the results are so rewarding. If you’d like, I can share a short checklist PDF you can print and take with you on pickups — just say the word and I’ll put it together.