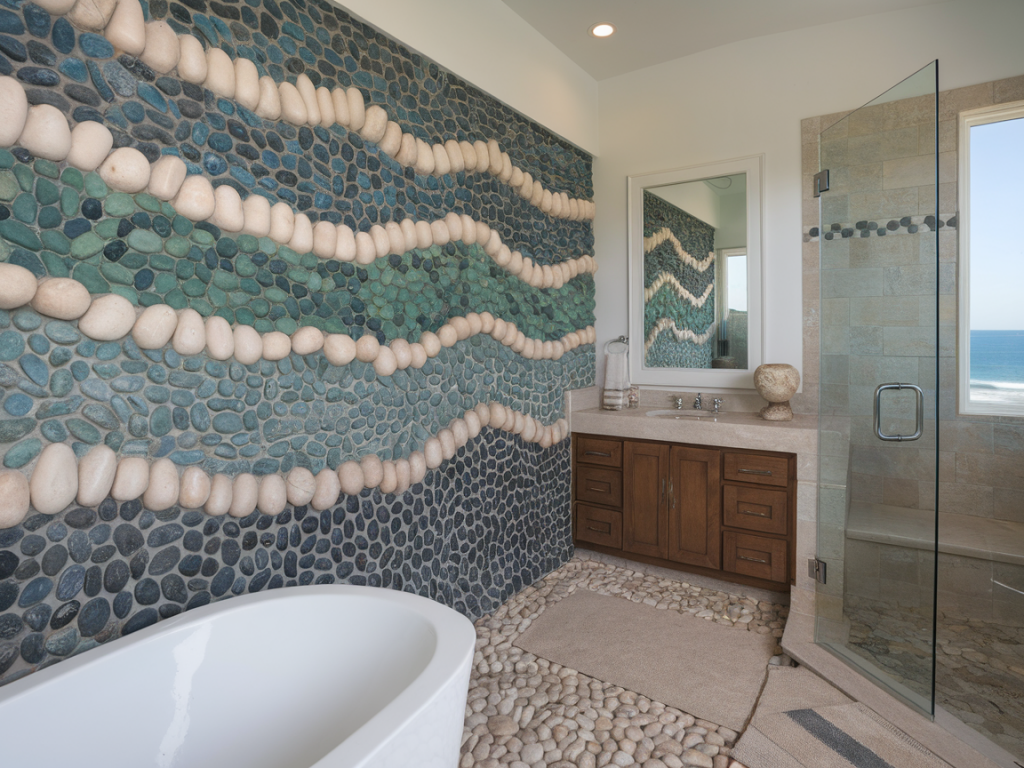
When I first moved to a small flat by the coast, I wanted my bathroom to feel like a gentle reminder of the sea — calm, textured, and a little wild. A full tile overhaul wasn’t in the budget, so I experimented with a pebble backsplash: tactile, inexpensive, and full of seaside character. If you love that coastal look but want something affordable and achievable in a weekend (or a few evenings), here’s how I make one that’s durable, kind to the planet, and full of personality.
Why choose a pebble backsplash?
A pebble backsplash brings natural texture and warmth that plain tile can’t. It’s forgiving of imperfections (which I love), hides water marks better than smooth surfaces, and lends a relaxed, coastal vibe without feeling kitschy. Best of all, you can use thrifted or locally foraged stones to keep costs low and the project sustainable.
What I use — materials and tools
Before I start, I gather everything so the work flows. Here’s my usual list:
- Pebbles: Smooth river or beach pebbles, mixed sizes (15–30mm mostly). Aim for 1–2kg per 0.1m² depending on pebble size and density.
- Mesh backing: Tile-mounted pebble sheets (optional) or fiberglass mesh for gluing loose pebbles.
- Thin-set mortar: A polymer-modified adhesive for wet rooms (suitable for bathrooms).
- Grout: Unsanded or sanded grout depending on pebble gaps (unsanded for very small gaps). I like neutral tones — warm grey or soft sand.
- Sealant: A penetrating stone sealer or grout sealer for wet areas.
- Tools: Notched trowel, rubber grout float, sponge, bucket, tile spacers (if using sheets), tile cutter or tile nippers (if trimming sheets), gloves, safety glasses, and a silicone caulk for edges.
Costs and where I source materials
Doing this on a budget is my favourite part. Here’s a simple cost breakdown from a recent small backsplash project (approx. 0.8m x 0.6m):
| Item | Estimated cost (UK) |
| River pebbles (5–10kg) | £8–£20 |
| Thin-set mortar (5kg) | £8–£15 |
| Grout (1kg) | £5–£10 |
| Sealant | £6–£12 |
| Mesh sheets (optional) | £10–£30 |
| Misc (gloves, tape, silicone) | £5–£15 |
| Total | £42–£112 |
If you’re lucky you can forage pebbles on the beach (check local rules) or pick up surplus bags at garden centres. I also look at eBay, local Facebook Marketplace, and builders’ merchants. For adhesives and grout, brands like BAL and Ceramix are reliable; for eco-conscious options, look for low-VOC products.
Step-by-step: how I create a pebble backsplash
I approach this in stages: prep, setting, grouting, sealing, and finishing. Take your time at each step — patience makes the result look professional.
1. Prep the wall
- Clean the area thoroughly. Remove any grease or soap scum and sand down glossy paint to give the adhesive something to grip.
- Measure and mark your backsplash area. If it’s behind a basin, I allow a 2–3cm silicone junction at the bottom to prevent water ingress.
- If you’re on plasterboard, consider cement board or waterproof backer board under wet zones.
2. Lay out your pebbles
- If you’re using mesh-backed sheets, lay them out on the floor first to plan the composition. Trimming will be needed at edges.
- For loose pebbles, arrange them on mesh before gluing, or sort them into sizes so you can create a natural-looking mix.
3. Apply thin-set
- Mix thin-set to a smooth, peanut-butter consistency. Using a notched trowel, spread an even layer on the wall — only over a small section at a time so it doesn’t skin over.
- Press pebble sheets into the thin-set. If you’re fixing loose pebbles, press the mesh-side of your pre-arranged pebble mesh into the thin-set and gently tap to seat.
4. Allow to set
- Follow the adhesive instructions — usually 24–48 hours for a full cure. I keep the room well ventilated and avoid splashes.
5. Grout carefully
- Choose a grout colour that complements the pebbles — a slightly warm tone usually looks most natural with coastal stones.
- Work grout into the gaps using a rubber float at a 45° angle. Take your time to fill tiny hollows; a pointing tool helps in small crevices.
- Wipe excess grout with a damp sponge, rinsing often. Let the grout firm up slightly, then refine the surface.
6. Seal the pebbles and grout
- Once the grout has cured (check the product instructions), apply a penetrating stone sealer. This reduces staining and makes cleaning much easier.
- For the joint where backsplash meets the basin or countertop, use a neutral-cure silicone to allow movement and prevent leaks.
Tips I’ve learned the hard way
- Don’t rush the grout stage. If you try to clean everything away too early you can pull grout from the joints and create gaps.
- Match sealers and adhesives. Some sealers can leave a slightly darker finish; test on a hidden pebble first.
- Think about maintenance. Pebble backsplashes are gorgeous but textured — expect to give them a gentle wipe-down rather than a quick spray and let it be. A soft brush and mild cleaner work best.
- Edge finish makes a difference. A slim metal trim (brass or brushed steel) or neat silicone bead at the border elevates the look and protects edges.
Design ideas and variations
There are lots of small ways to make the backsplash feel uniquely yours:
- Mix white and grey pebbles for a classic beach look, or add a few fossilised or flat stones for focal points.
- Create a simple gradient — darker pebbles at the bottom graduating to lighter at the top.
- Frame the pebble area with reclaimed wood or a slim brass trim for contrast.
- Use pebble strips as a border rather than covering the whole wall for a subtler effect.
If you’d like, I can put together a shopping list tailored to the size of your space, or draft a simple mood board with colour and material suggestions. I’ve tested these methods in a small bathroom and they’ve held up beautifully — with a bit of time and care, a pebble backsplash gives a tiny bathroom a big, seaside heartbeat.